Homemade Yogurt
This post may contain affiliate links which won’t change your price but will share some commission.
Homemade yogurt is so easy to make and it tastes delicious. Even better, it costs four times less than the store-bought version.

Making homemade yogurt is a great way to save money on groceries. Once you get used to the process, you’ll see that it takes almost no work to make a beautiful batch of Greek yogurt. It took me a few tries to get it right, but I’m so glad I stuck with it.
How to Make Homemade Yogurt
It’s simple to make your own yogurt. Here are step-by-step photos that guide you through the process. You’ll find detailed instructions in the recipe card below.


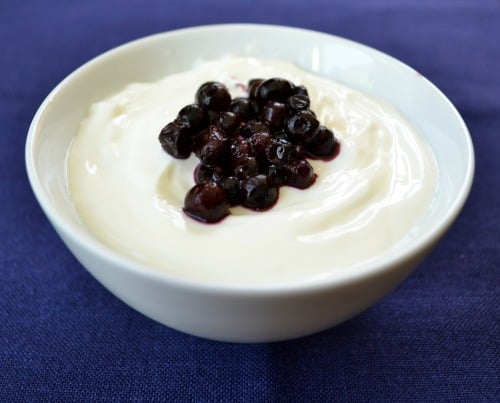
Use this yogurt to make a homemade orange yogurt parfait, and try a few more easy DIY dairy products.

Recommended Equipment
Ingredients
- 4 cups whole milk
- 2 tbs plain whole milk yogurt
Instructions
- Heat the milk to a temperature of 180 degrees, and then let it cool to 110-115 degrees. You can do this by heating it on the stove top and monitoring the temperature with a thermometer, or by using a slow cooker. If you use the slow cooker, heat it on low for 2 hours and then turn it off and leave it covered in the slow cooker for another 3 hours.
- Set up a cooler with a bath towel inside.
- Fill a pot with a few cups of boiling water and place it in the middle of the cooler. Be careful to keep the pot from touching the sides of the cooler (the towel is a buffer). Cover the cooler.
- Pour the milk in a large glass container, and add the yogurt. Stir to combine.
- Place the glass container in the pot of water in the cooler. Place a meat thermometer in the cooler and close the cover. Ideally, the temperature will be between 90 degrees and 120 degrees. Let it sit for 6 hours.
- After 6 hours, replace the water with a fresh pot of boiling water. Let it sit for another six hours.
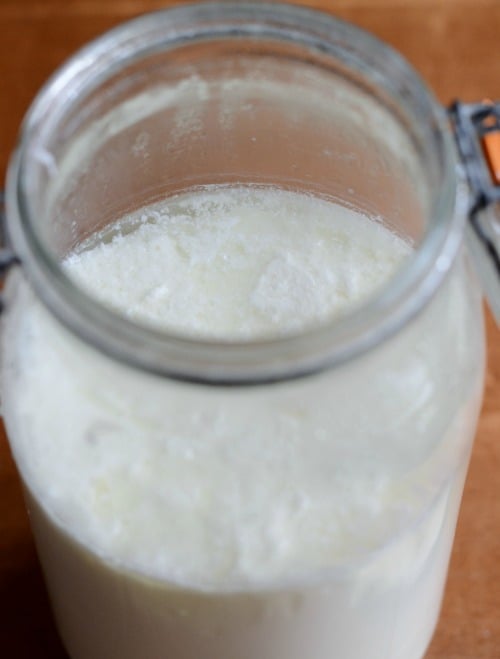
- After 12 hours, the yogurt should be done. If it doesn’t seem ready, replace the boiling water again and leave it for another 6 hours. There will be liquid on the top (whey) and yogurt at the bottom. When the yogurt is ready, put the yogurt in the freezer for 20 minutes to help it thicken.
- Separate the whey for another use by placing the yogurt in a strainer lined with a cheese cloth. Let the whey drip out until you have the consistency you want. I use this Butter Muslin, which is woven more tightly than some cheese cloth and it’s washable and reusable.
Approximate Nutrition Info
This recipe may contain affiliate links. A purchase or click through one of these links may result in a commission paid to us at no additional cost to you.
Price Breakdown
I spent $.96 on the ingredients for this batch of homemade yogurt. I let a lot of the whey drain out to yield a thick, Greek-style yogurt, so the final product was only about two cups of yogurt. If I had left it thinner, it would have been closer to a quart of yogurt. A two-cup container of Chobani plain Greek yogurt has a shelf price of $3.49. Store-bought Greek yogurt would cost almost four times as much as my homemade yogurt. This recipe is definitely worthwhile for that kind of savings.


Hi Ive been making Greek Yoghurt like this for a long time but nowhere can I find what the actual nutrients are….and its a complicated system to find out as the whey gets drained off. So cals, carbs, fat and protein. Anyone got the answer?
Thanks for sharing this recipe with me, Annemarie! I pinned it and hope to try one of these days! For now, it’s easier to buy it…but this DOES look simple. Plus, I’m struggling to find full-fat yogurt anywhere near my house, so I would love to give it a shot! I will let you know how it goes when I do!
I have a hard time finding full-fat yogurt too, LeAnn. Hopefully the tide will change sometime soon and the low-fat stuff will be hard to find!
Your oven light makes a perfect incubator for the yogurt. After heating and cooling the milk and adding a couple of spoonfulls of yogurt (left over) cover the container, cover with a towel and put in your empty oven with just the light on. Leave 4 hours, remove from oven and stir in or drain off whey, put into storage containers and store in the frig over night. In the morning – yummy yogurt
Dian, I’ve heard that people have success making yogurt with the heat of the oven light. That was the first method I ever tried, but it didn’t work for me. I ended up with watery, milk-like yogurt.
So you have to start out with store bought yogurt to make your own? Sorry if this is obvious, I’ve never attempted anything like this before!
Good question, Lisa! They do sell yogurt starters, but I just used store-bought, full fat plain yogurt for my initial batch. I’ve saved a few tablespoons of each batch I’ve made since then. That’s what goes into the next batch and turns the milk in to yogurt. Let me know if you try it!
I’m the founder/moderator for Punk Domestics (www.punkdomestics.com), a community site for those of use obsessed with, er, interested in DIY food. It’s sort of like Tastespotting, but specific to the niche. I’d love for you to submit this to the site. Good stuff!
I’ve done the salad explosion thing too! I’ve also exploded mustard bottles, spilled heaps of sugar into cake batter, and dropped entire dinner plates on the floor. What a rewarding ending to your yogurt story though! I eat Greek yogurt every day, which can be a bit expensive if buying well-known brands, but yours looks just as tasty!
Amy, I’m glad I’m not the only one with these kitchen disasters to share! At least it was sugar and not salt in the cake batter. . .
May I ask … if I use Greek yogurt as the starter, do you know if it will have the probiotics? We use Greek yogurt to combat one of my children’s battle with yeast, so this is an important detail for me. Thanks 🙂
Lisa Grace, if your starter yogurt has probiotics, then the homemade result should have them too. Read the package carefully to be sure the yogurt you use for your first batch has what you want in it.
Wanted to come back and tell you that I got a yogurt maker for Christmas. Everyday since then I have made homemade yogurt. The kids all LOVE it. We add fresh or frozen fruit. I have also made homemade yogurt shakes. Breakfast is the yogurt with some granola sprinkled on it. Because we are a larger family we are going through 6 servings a day. Not so sure how much money I save making it but it is nice to know there are no preservatives and we control the amount of sugar. I use 1% milk and it comes out quite thick. You do have to cook the milk on the stove top but then you just toss it in the yogurt maker and it is ready in about 11 hours. I try to do it early in the morning so it is ready for the fridge at night. Anyway, just wanted to stop back by and let you know I did try it but cheated with the yogurt maker. We are hooked!
That’s great, Margaret! I’m so glad it’s working for you. Isn’t it nice to know exactly what’s in your yogurt? I would use a yogurt maker too if I had one!
When I make yogurt I leave it in my oven with the light on. It works good. I have been having a issue with my yogurt having lumps in it and not sure why. I use fat free milk w 2T Greek yogurt as my starter. And follow your way but use the oven.
Whitney, I tried the oven method, but it didn’t work for me. Maybe my light bulb wasn’t hot enough. I’m glad you’ve found a method that works for you. I haven’t experienced the lumps, but maybe it’s a result of the fat free milk. I always use whole milk.
Annemarie,
I too have been thinking about making yogurt and fresh mozzarella cheese. Seems easy when you see it on Pinterest. We go through so much yogurt in this house – adds up quick. No joke my yogurt bill per week is probably close to $20. Maybe I will try your recipe and tips. Will let you know.
Merry Christmas!
Margaret
Try it, Margaret! It’s a great little science experiment to do with the kids too.
So glad it worked for ya! I think it’s pretty normal to have a few flops at the beginning of the yogurt-making process – totally know what you mean when you say you ended up with milky yogurt!
Thank you so much! I knew the word “brainless” in the title meant this had to be the one I couldn’t mess up!