• Contact
  • About
    • My Book
  • Video Services
    • Recipe Video Equipment
  • Frugal Recipes
  • Travel
  • Saving Money
  • Meal Planning
    • Real Food Meal Plans

Real Food Real Deals

Healthy food on a budget

Home » Recipes » Side Dish » Soft Whole Wheat Bread Recipe

Soft Whole Wheat Bread Recipe

10/07/14 | Recipes, Side Dish, Vegetarian

This post may contain affiliate links which won’t change your price but will share some commission.

6.8Kshares
  • Share73
  • Tweet
  • Pin6.7K
Jump to Recipe Print
Believe it or not, you can make SOFT whole wheat bread. This recipe gives you all the tips you need to bake the perfect loaf of whole grain sandwich bread from scratch.

This soft whole wheat bread recipe is the answer to all those dense, brick-like loaves of whole wheat bread you’ve tried. Healthy bread without the chemicals!

Believe it or not, you can make SOFT whole wheat bread. This recipe gives you all the tips you need to bake the perfect loaf of whole grain sandwich bread from scratch.

There’s one thing that’s eluded me over these past few years as I’ve tried to feed my family real food. It’s the bread thing. I just couldn’t get my hands on a homemade whole wheat bread recipe that yielded anything other than a brick.

I baked loaf after loaf, and they always tasted good out of the oven. But then as the hours passed, each loaf would turn into a dense mass. It was always edible as toast, but “edible” isn’t exactly what I was going for.

I wanted a soft, 100 percent whole wheat loaf of bread that would stay soft for a few days. I wanted bread that I could freeze and then defrost for sandwiches later in the week. Why couldn’t I make bread that my kids would love?

Yeast for Homemade Bread

Then one day I came across a bread recipe from My Healthy Green Family. Looking at her post, I realized part of the problem with the previous loaves I had made.

She included a photo of the yeast bubbling up in a measuring cup. It was much more active and bubbly than my yeast had ever been, which is part of the reason why my bread hadn’t been rising properly. Letting the yeast activate for 5 minutes, which most recipes advise, isn’t long enough to get the job done correctly.

I tried the recipe from My Healthy Green Family, and it came out great. After adapting it a bit to suit my family’s texture preferences, I’m thrilled to finally have a soft whole wheat bread recipe that everyone in my house likes.

I never thought I’d see the day.

Soft Whole Wheat Bread Tips

I want to share a few important tips about baking bread before I get to the recipe.

Yeast: Make sure your yeast bubbles up nicely. If it doesn’t, throw it away and try another packet. You’re wasting your time if you make a batch of bread with yeast that doesn’t look like this after 20 minutes or so:

soft whole wheat bread yeast

Baking Time: Another thing I’ve learned about baking bread is that sometimes the bread looks done before it’s actually cooked through in the middle. Using a thermometer to get an accurate temperature reading is a great way to make sure your soft whole wheat bread won’t come out of the oven with a gummy center. See the recipe below for details.

Texture: Once you get into the habit of making homemade bread, you’ll get a feel for when the dough has reached the proper texture. You can’t always follow a recipe and get the right result by simply adding the exact amount of flour, water, and other ingredients called for in the recipe. Variations among different brands of flour will impact the final product. The dough should be well-hydrated but not sticky.

bread before rise

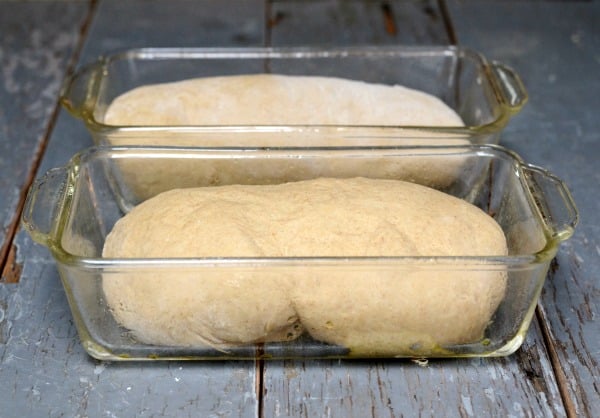
This is the dough in the loaf pan before the second rise.

Soft whole wheat bread dough after the second rise.

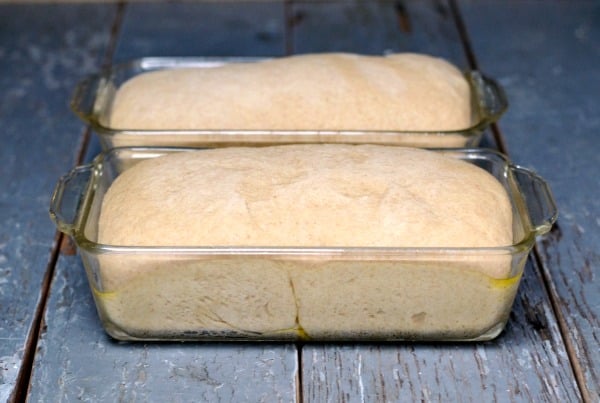
And this is the dough after the second rise.

The bread keeps on rising as it bakes in the oven.

The bread keeps on rising as it bakes in the oven.

Try my whole wheat Irish soda bread for another easy, delicious homemade treat.

Soft Whole Wheat Bread

This soft whole wheat bread recipe is the answer to all those dense, brick-like loaves of whole wheat bread you've tried. ($.26 per serving)
Print Pin Rate
Course: Side Dish
Cuisine: American
Keyword: Whole Wheat Bread
Prep Time: 20 minutes
Cook Time: 40 minutes
Total Time: 1 hour
Servings: 12
Calories: 250kcal
Author: Annemarie Rossi

Ingredients

  • 6 cups white whole wheat flour divided (plus more for kneading)
  • 1/4 cup whey, lemon juice, or vinegar (optional)
  • 2 1/2 tsp active dry yeast
  • 1/4 cup + 1 tbs. honey divided
  • 4 tbs melted butter or coconut oil divided
  • 2 eggs
  • 1 tsp salt

Instructions

  • In the evening before baking, mix together 3 cups of whole wheat flour, 1/4 cup whey or other acid (optional), and 2 cups of water. Some people find the bread is easier to digest if the flour is soaked with an acid. Cover and let the dough sit at room temperature overnight. (I use this silicone lid, but you could also use plastic wrap or a warm kitchen towel.)
  • In the morning, stir together the yeast, 1 tablespoon of honey, and 1/4 cup warm water (105-115 degrees). Let the mixture get very bubbly. It should take 20 to 30 minutes. If your yeast mixture doesn’t look like the photo above, your bread won’t rise properly.
  • Place the soaked flour mixture in the bowl of a stand mixer. Add the yeast mixture. Then add the following: 3 tbs. melted coconut oil or butter (cooled), 1/4 cup honey, 2 eggs, 1 tsp. salt, and 3 additional cups of white whole wheat flour. Mix using the dough hook attachment.
  • If the dough is quite sticky, add a little more flour. It should be well hydrated, but not too sticky to handle. You may need to add as much as another cup of flour. If it seems dry, add a bit more water.
  • Knead the dough in the stand mixer with the dough hook (or by hand on a floured work surface) for 10 to 15 minutes. I usually start the kneading process in the mixer and then finish it off by hand.
  • Transfer the dough to a greased bowl with enough room for it to double in size. Cover the bowl and let it rise for about 2 hours, or until doubled in size. If your room is cooler than 70 degrees, the rise time will be longer.
  • Knead the dough for 2 minutes, then divide it into two balls.
  • Using a rolling pin, roll out each ball of dough to a thickness of 1 inch. Then roll up each section of dough into a loaf shape. Place the loaves in 2 large, greased loaf pans. Cover with a wet kitchen towel and let the loaves rise again until doubled in size (about 2 hours).
  • Score the loaves with a sharp knife by slashing them with a line about 1/4 inch deep down the middle of each loaf (lengthwise).
  • Bake at 350 degrees for about 40 minutes. I find it very tricky to determine if a loaf of sandwich bread is done. Even if it’s “nicely browned” and thumps with a hollow sound, the dough may still be gummy in the middle of the loaf. Big disappointment after all that work! The best way to tell if it’s done for sure is to insert a thermometer and see if it’s reached a temperature of 190 to 200 degrees.
  • Let the loaves cool for at least 10 minutes before removing them from the pans. Melt the last tablespoon of butter and brush the melted butter on top of the loaves while they’re cooling. This will keep the crust soft.

Nutrition Estimate

Calories: 250kcal
Tried this recipe?Mention @realfoodrecipes or tag #realfoodrealdeals!

Soft Wholemeal Bread Recipe Price Breakdown

This recipe costs a total of $3.13 to make, or $1.57 per loaf. A loaf of Great Harvest’s Honey Whole Wheat Bread costs $5 where I live, for a savings of $3.43 per loaf. If you go through 2 loaves of bread a week, this comes out to a savings of $356.72 per year. Since my kids won’t even eat the Great Harvest bread, this whole wheat bread recipe has become essential in my house. I hope you’ll try it!

6.8Kshares
  • Share73
  • Tweet
  • Pin6.7K

Related

Comments | 39 comments

Copyright

© The recipes, opinions, photos, and other content expressed on this website are those of the author/owner unless otherwise noted. Unauthorized use and/or duplication of this material, including photos, without written permission from the author/owner is strictly prohibited. In cases where permission is granted, full and clear credit must be given to Real Food Real Deals with appropriate and specific direction to the original content.

Subscribe

Send me your weekly newsletter!

Privacy Policy

Disclosure

The FTC has regulations about what bloggers disclose when recommending or advertising products. This information is outlined in my disclosure policy.
« Real Food Meal Plan Week 34
Organizing Kitchen Cabinets with OXO »

Comments

  1. carolinesue says

    February 13, 2016 at 12:51 pm

    I feel like I am trying to make this from a recipe none of you used. This bread is as dry as a bone and I can’t even get dough out of it. I have so far added 1/2 cup water and it still is dry and doesn’t stick together. I did not soak the flour as you said it was optional. Is that the problem?

    Reply
    • Annemarie says

      February 13, 2016 at 2:29 pm

      I’m sorry the recipe isn’t coming together for you. I don’t think the lack of soaking would cause such an issue. One of two things is probably at play. Either you measured one of the ingredients incorrectly (it happens to all of us!), or the flour you’re using is especially “thirsty.” Keep adding water until you get the described texture, and hopefully it will come out well. Good luck!

      Reply
  2. revampiece says

    December 27, 2015 at 4:53 pm

    Hello Anne Marie,
    I was wondering what yeast brand you used. I used the fleischmann’s Active dry yeast but mine does not look like the one in your post.

    Reply
    • Annemarie says

      December 27, 2015 at 5:03 pm

      I’ve used all different kinds of yeast, including Hodgson Mills and Red Star. Sometimes one package will work well and another one won’t, even when it’s the same brand. Be sure to check the expiration date.

      Reply
  3. Jaclyn says

    August 9, 2015 at 11:34 pm

    After countless WW bread recipe attempts, I tried your’s today and can confidently say it was the best one! It was even way better than Great Harvest’s $5.50 loaf I tried out of desperation! I only soaked the flour mixture for an hour or so and left out the acid. Just curious- is there any benefit to still soaking the flour if not adding an acid? I don’t mind the extra step if so, but I’ll leave it out if it’s unnecessary 🙂 Thank you for ending my search for a great whole wheat bread recipe!

    Reply
    • Annemarie says

      August 10, 2015 at 10:11 am

      I’m so glad you liked it, Jaclyn! I think the soaking is important with or without the acid, but I haven’t actually tried this recipe without soaking. Let me know if you try it that way.

      Reply
  4. Courtney says

    July 13, 2015 at 3:44 pm

    I made this and it is excellent! I froze most of it as we don’t eat much bread. It was great/soft after even a few days out (I kept in a cast iron Dutch oven with a cotton napkin) and great once thawed. Excited to try the whole wheat biscuits next!!

    Reply
    • Annemarie says

      July 13, 2015 at 3:56 pm

      So glad you liked the bread, Courtney! The biscuits are even easier to make, and very tasty. Enjoy! 🙂

      Reply
  5. rebelhomesteadlife says

    July 4, 2015 at 12:04 am

    *loud chewing noises* Mmm, this is delicious! I used whole wheat flour, didn’t soak overnight, and it still turned out amazing! Thanks for the great recipe! Definitely going into my recipe book!

    Reply
    • Annemarie says

      July 4, 2015 at 7:38 am

      So glad you liked it!

      Reply
  6. Cecilia says

    June 8, 2015 at 9:38 am

    This bread looks amazing! I would love to try to make it. Do you know the gram measurements? If not I will be happy to calculate them myself. One important question though: are the “cups” US cups or metric cups?

    Hugs from a drooling Norwegian girl 🙂

    Reply
    • Annemarie says

      June 8, 2015 at 9:41 am

      I don’t have the gram measurements, Cecilia. Sorry about that! The measurements are in U.S. cups. Let me know if you figure out the conversions.

      Reply
  7. Jami says

    March 17, 2015 at 4:17 pm

    So glad to have come across this recipe! It turned out beautiful and soft! Finally! I think I finally found our bread “not” from the store!!! So so thankful!!!

    Reply
    • Annemarie says

      March 17, 2015 at 4:26 pm

      That’s fantastic! I was so excited when I finally got the recipe right. I’m glad it worked well for you. 🙂

      Reply
  8. Hokanut says

    January 17, 2015 at 7:22 pm

    Just tried this. But being a guy with little patience I only soaked the flour for an hour and used half lemon juice and half rice wine vinegar because I was just about out of both, Added one Tbs. sugar for my sweet tooth. I just carved off the first slice 20 minutes after pulling it from the oven and put a scoosh of butter on it, and had to drop you a note. This is the tastiest bread since my Mom made bread in the 70’s. Thanks. So easy even a mechanic can do it.

    Reply
    • Annemarie says

      January 17, 2015 at 7:28 pm

      Fantastic! I’m so glad to hear that you liked it. Thanks for letting me know.

      Reply
  9. Amanda says

    January 11, 2015 at 5:05 pm

    Wow a great, soft wheat bread! So glad to be able to feed my family something healthy that they will enjoy. Great detailed instructions and tips made it fail proof. Thanks so much!

    Reply
    • Annemarie says

      January 11, 2015 at 7:25 pm

      Thanks so much for letting me know, Amanda. I’m so happy to hear that it went well!

      Reply
  10. Sara says

    November 4, 2014 at 3:21 pm

    I made this yesterday and my family loved it! How do your store your loaves after they are cooked??

    Reply
    • Annemarie says

      November 4, 2014 at 3:40 pm

      I’m glad you all liked it! I slice it once it’s cool, then I transfer what we’ll eat in the next two days into a zipper bag or airtight container. The rest goes in the freezer. I try to bunch the slices in pairs in the freezer (in a zipper bag) so it’s easy to remove two at a time.

      Reply
  11. Emelie says

    October 27, 2014 at 10:20 am

    Can I switch the eggs for something else?

    Reply
    • Annemarie says

      October 27, 2014 at 12:05 pm

      Emelie, the eggs help the bread to rise and soften, but you can make this recipe without them. It will be slightly less soft, but still very good.

      Reply
  12. athleticavocado says

    October 14, 2014 at 4:28 pm

    this looks amazing! I love wholesome and hearty bread! Yum!

    Reply
  13. Haley says

    October 8, 2014 at 12:46 pm

    Do you have any recommendations for soaking all of the flour?

    Reply
    • Annemarie says

      October 8, 2014 at 1:19 pm

      I haven’t had a chance to try it that way yet, Haley, but it’s on my radar. The flour added in the morning does get the benefit of soaking for the 4 hours of rise time.

      Reply
      • Haley says

        October 8, 2014 at 2:45 pm

        Ok, thank you. I’m going to try this recipe out right now!

      • Annemarie says

        October 8, 2014 at 3:37 pm

        I look forward to hearing how it goes!

  14. Leah says

    October 7, 2014 at 8:59 pm

    Would this recipe work in a bread machine?

    Reply
    • Annemarie says

      October 7, 2014 at 9:02 pm

      Leah, I don’t have a bread machine, so I’m not sure. I think it would, though. Let me know if you try it.

      Reply
  15. Valerie B says

    October 7, 2014 at 6:19 pm

    I have whole wheat flour, but it isn’t white whole wheat flour. Do you think that is OK to use?

    Reply
    • Annemarie says

      October 7, 2014 at 6:42 pm

      Yes, Valerie, plain whole wheat flour will work. I find it to be a little heavier than white whole wheat flour, though, which may make the bread a bit more dense. You may want to substitute 1 cup of unbleached white flour for a cup of the whole wheat flour to lighten it up. Let me know if you try it.

      Reply
  16. Deanna Segrave-Daly (@tspbasil) says

    October 7, 2014 at 10:34 am

    I cannot wait to make this! I love making bread and so ready to switch the family off store whole wheat. Thanks for sharing your tips & tricks!

    Reply
    • Annemarie says

      October 7, 2014 at 12:37 pm

      Thanks, Deanna! I hope your family likes it. Let me know how it goes.

      Reply
      • Gerri says

        March 15, 2015 at 6:28 pm

        Made this today. Started last night with Whey. I do not have a dough hook and had to do it by hand. Perhaps I didn’t knead it enough. Took forever to rise in a warm home. My yeast looked like yours. It doubled in size in the pans but didn’t raise while baking. *sigh*

      • Annemarie says

        March 15, 2015 at 6:30 pm

        Maybe it had risen enough before the oven, Gerri? How did it taste, and how was the texture?

    • seema says

      December 22, 2014 at 9:19 pm

      Thank You. I make bread and it is exactly as you say. Dense and not as good after it cools done. I am going to try your recipe will all your tips now. Seema

      Reply
      • Annemarie says

        December 23, 2014 at 10:41 am

        Thanks, Seema! Please let me know how it goes.

    • Diana Martin says

      May 1, 2017 at 11:25 pm

      I’m just curious: what would happen if you used just whole wheat flour with this recipe. all other things the same?

      Reply
      • Annemarie says

        May 2, 2017 at 6:39 am

        It should be fine, Diana. Let me know if you try it.

Leave a Reply Cancel reply

Your email address will not be published. Required fields are marked *

Welcome

I'm Annemarie, a regular mom who got tired of feeding my family processed food. Read More…

  • Facebook
  • Google+
  • Instagram
  • Pinterest
  • Twitter

Stay Updated

Send me your weekly newsletter!

Privacy Policy

Top Posts

Dehydrated Banana Chips
Steel Cut Oats Cookies
Oat Flour Pancakes
Ginger Lime Asian Slaw
Gluten Free Cranberry Muffins
Instant Pot Beef Stew

Copyright © 2019 · Tasteful theme by Restored 316

COPYRIGHT © 2019 Real Food Real Deals | Privacy Policy | Permissions Policy | Terms & Conditions